Monday 30 April 2012

Foodie Pen Pal Parcel – Chocolate Orange Bites


If you regularly peek at my blog you will have seen that last month I took part in foodie pen pal parcel scheme where foodie bloggers from around the UK (and now the rest of Europe) send each other parcels filled with wonderful foodie delights. We then all receive parcels from someone else in the pen pal parcel chain, get incredibly excited when we open them and then share our delight by blogging about what we got.

This month I was lucky enough to receive a wonderful parcel from Jen @lifestarts. As can be seen in the photos my parcel came in a personalised ‘Something’s MISSING!’ box…such a lovely touch which increased my excitement before I even broke into the box.


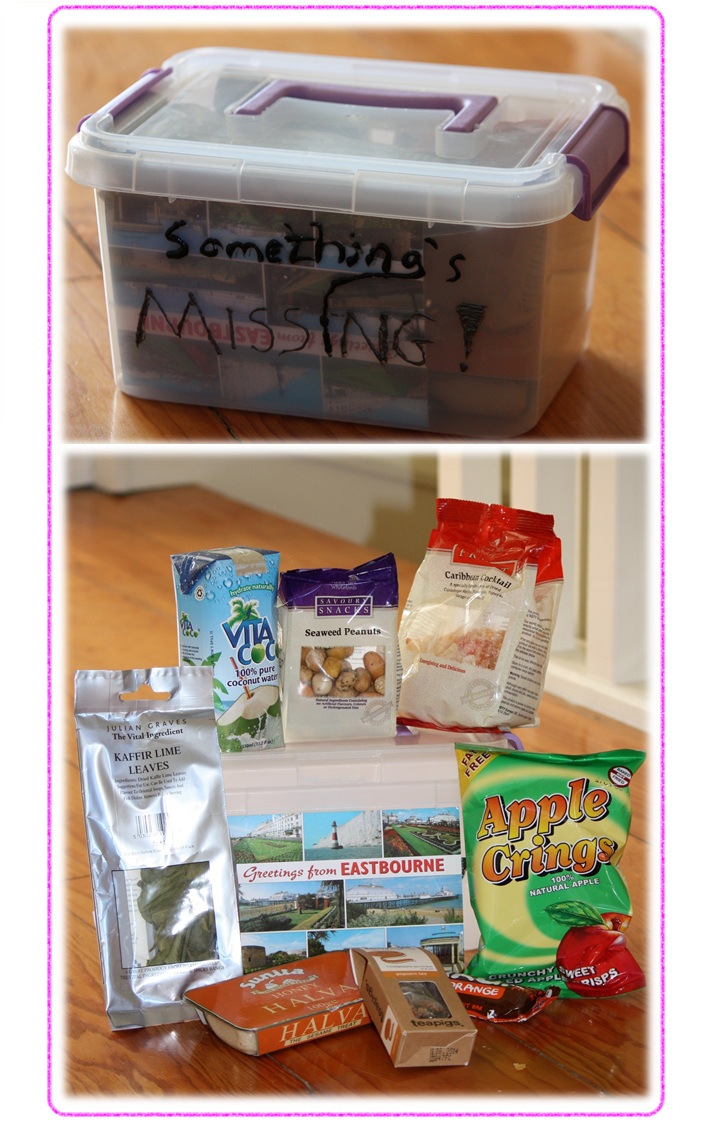
But the contents were just as exciting;

Apple rings…a natural fruity crisp that I enjoyed munching on at the cinema this weekend proving a great alternative to popcorn. Jen also challenged me to create my own version of these…I haven’t had time to experiment yet but definitely will give it a go soon!

Vita coco…as instructed I enjoyed this chilled after a rather hectic game of squash and it proved to be nicely refreshing.

Halva…mmmmmmm, I adore all things sesame.

Popcorn tea…this was really good, it didn’t taste of popcorn but had a toasted nutty flavour that complimented the green tea really rather well.

Kaffir Lime Leaves…I love Thai food so these will definitely be used up quickly.

Seaweed peanuts…I have had these before and knew that I loved them so tucked into these first (they didn’t last long!)

Caribbean cocktail…a really nice selection of tropical dried fruit

Nakd Bar…This is one of Jen’s favourite healthy snack bars. I had never come across them before but this was absolutely delicious.


It is gluten and wheat free just containing dates, cashews, raisins and cocoa with a little orange flavouring and tasted divine with a rich chocolaty orange flavour...definitely a great alternative to a normal chocolate bar when you are in need of a sweet fix. In fact I enjoyed it so much that I decided to attempt my own version of this raw food bar. I had a slightly different selection of dried fruits and nuts in my cupboard at home so went for a cherry and almond version but was quite chuffed with my final result.

So thanks Jen for my lovely box of goodies and for the inspiration for the following recipe.


INGREDIENTS

60g flaked almonds
85g dates
40g dried cherries
15g cocoa
1 tsp. orange juice
½ teaspoon orange blossom water

Makes 8 bites

Place the flaked almonds in a food processor and blitz until ground up (it may just be easier to use ground almonds but I didn’t have any at the time!) then transfer the almonds to a bowl.

Roughly chop the dates and cherries and put into the food processor with the orange juice and orange blossom water. Blitz until well combined and then transfer to the bowl with the almonds.

Add the cocoa to the bowl and mix until well combined. After initially mixing with a spoon I found it easier to get stuck in with my hands to thoroughly mix the ingredients together.

Then divide the mixture into 8 little balls and pat each down to form little disks and decorate with a flaked almond slice.

Store in an air tight container until you are ready to munch!


Sunday 29 April 2012

Flourless citrus drizzle cake....with mashed potato!


I recently became the incredibly proud owner of a potato ricer. I have been meaning to purchase one of these kitchen gadgets for ages and finally got around to adding one to my ever growing selection of culinary paraphernalia thanks to a Lakeland voucher received as a leaving present when I left my old job back in February. So along with a tagine (will also be experimenting with that one soon) and some rather sharp knives (yup the use of these has already resulted in a need of raiding the first aid kit for plasters!) I bought a potato ricer. Once it arrived I immediately went out and bought a rather large bag of spuds and started producing beautifully smooth and creamy mashed potato as well as copious amounts of gnocchi. But despite my best efforts the potatoes I had purchased didn't really seem to be running down so I started to look for alternative potato recipes and came across a flourless lemon drizzle cake that uses mash which I couldn't resist trying. The result is a nicely moist and zesty cake which is gluten free and which doesn't taste of potato…always a good thing in a cake I think!


INGREDIENTS

200g butter
200g caster sugar
4 eggs
100g polenta
100g ground almonds
250g cold mashed potato
Zest from 2 lemons and 2 limes
2 teaspoons of gluten free baking powder

FOR THE DRIZZLE

Juice from 1 lemon
Juice from 1 lime
75g caster sugar                          

FOR THE BUTTER CREAM

150g butter
300g icing sugar
Juice from half a lime
A couple of drops of food colouring

Makes approx 18 cup cakes

Pre-heat oven to 180 deg C / 350 deg F

Beat the sugar and butter together until light and fluffy.

Add the eggs one at a time to the sugar and butter, mixing thoroughly.

Fold in the almonds, polenta, mashed potato (mashed with a potato ricer or just good old potato masher, but ensure it is just plain mashed potato and isn’t seasoned or has milk of butter added when mashing), lemon and lime zest and baking powder.

Divide the mixture between 18 cupcake cases placed in a cup cake baking tray and place in the oven.

Cook for 25 to 30 minutes until lightly golden in colour and firm to the touch.

Once cooked remove the cakes from the oven and use a sharp knife to make a couple of slits in each of the cupcakes.

Mix the sugar and juice from the lemon and lime for the drizzle in a small bowl and stir until the sugar has dissolved. Then spoon a little of the mixture over each of the cupcakes allowing the syrup to soak into each of the cakes. Then allow the cakes to cool fully.

Once cool the cakes can be decorated with butter cream. Beat together the softened butter and icing sugar until smooth. Add the lime juice, adding a little more icing sugar if necessary to prevent the mixture from becoming to runny. I then split the butter cream between 2 bowls and coloured one with yellow food colouring and one with green, then spread the icing onto each cake.

The citrus drizzle cakes are now ready to enjoy!

Tuesday 24 April 2012

Vegan Almond and Cherry Ice Cream


On a recent trip to my local supermarket I was instantly drawn towards a special offer on almond milk. I had never tried almond milk before but as it is a dairy free alternative to the usual ‘white stuff’ and because of its promotional price I bunged it in the trolley with the aim of combining it into something for the blog. Once home however I wasn’t exactly sure what to create but after a quick taste testing session and a trawl through my cupboards for complimentary ingredients (cherry jam being the obvious first choice) I decided I had to try and make almond ice cream. Ice cream is often made using a custard base so I went for a complete cheat on this one and used Bird’s custard powder. But after examining the ingredients list I discovered that Bird’s traditional custard powder is vegan friendly so the resulting ice-cream is vegan friendly too!


INGREDIENTS

1 litre almond milk
60g Bird’s traditional custard powder (not the instant stuff)
50g caster sugar
½ vanilla pod
100g good quality cherry jam

Put the almond milk and sugar into a large saucepan and add the seeds scraped from the vanilla pod (I also add the pod for extra flavour). Place the saucepan over a gently heat and very slowly bring to the boil allowing the vanilla flavours to infuse into the milk.

Whilst the milk is heating up but the custard powder into a large bowl and add a tablespoon of water. Mix until a smooth paste is formed (adding a drop more water if needed).

Once the milk begins to boil remove from the heat, fish out the vanilla pod and pour into the bowl containing the custard powder paste ensuring that you continually stir the mixture as you add the milk as the mixture should instantly being to thicken. Keep stirring the mixture until thickened and smooth.

Allow the mixture to cool and then transfer to an ice cream maker if you are lucky enough to have one (I still haven’t got around to that purchase!)…

…or alternatively put the mixture into a freezer proof container and stick into the freezer. After a couple of hours transfer the mixture into a food processor and blitz until you have a smooth, creamy consistency. Transfer the mixture back to your freezable container and stick the mixture back into the freezer. Leave for another couple of hours and then remove and blitz in the food processor again. Repeat this process again after another couple of hours, blitzing the mixture for a third time, this should break up the ice crystals in the mixture enough to prevent the ice cream turning into one large ice cube, producing an easily scoopable result.

After the final blitz in the liquidizer (or at the end of the ice-cream machine churning period) take the cherry jam and swirl into the mixture. Then stick the mixture back into the freezer and after a couple of hours it will be ready for you to enjoy.

Tuesday 17 April 2012

Vegan Coconut and Ginger Panna Cotta with Rhubarb

It’s rhubarb season…yay! I love rhubarb, I really could eat mountains of the stuff. What is not to love about this beautifully pink, tart and tangy foodstuff. Apart from the classic rhubarb crumble, I generally prefer to eat mine just gently stewed with a bit of brown sugar and served with a large lump of greek yoghurt. However after baking up my tropical hot cross buns I found I was left with quite a large amount of coconut milk so I decided to combine these two ingredients to form a slightly alternative rhubarb desert. And so the  coconut and ginger panna cotta was born, accompanied with my favourite….lightly stewed rhubarb. I also decided on making the panna cotta vegan by using my vegetarian setting agent 'Vegeset' in this recipe (although I think to be honest I slightly overdid it on the setting front and my panna cotta didn’t quite have enough of the required wobble but it was still delicious so that’s all that matters right?!?).


INGREDIENTS

FOR THE PANNA COTTA
500ml coconut milk
1 large knob of ginger, peeled and grated
2 tablespoons of caster sugar
1 level teaspoon of Vegeset (or other vegetarian friendly setting agent)


FOR THE RHUBARB
250g of rhubarb
20g soft brown sugar
The zest and juice from half a lime

Makes 4

Place the coconut milk and sugar in a large saucepan and place over a gentle heat, stirring until the sugar has dissolved.

Once the sugar has dissolved add the grated ginger to the pan and let the mixture gently simmer for 20-30 minutes (or longer if you want a really gingery kick to your panna cotta).

Pass the coconut milk mixture through a sieve to remove the grated ginger, add the vegetarian setting agent as instructed (I allowed by mixture to cool, sprinkled my Vegeset on top and then brought the mixture to the boil until thickened).

Divide the mixture into four ramekins and allow to cool before covering with cling film and transferring to the fridge to set for a couple of hours.

Before serving slice the rhubarb into 2cm long chunks, add to a saucepan with the sugar and lime juice and zest and gently heat for 10-15 minutes until the rhubarb has begun to break down.

Remove the panna cotta from the fridge, remove the cling film and carefully turn out onto serving plates. The panna cotta should just come away from the ramekins but if you have any troubles quickly dunk the ramekins into a bowl of hot water to loosen the edges. Then serve with a generous helping of stewed rhubarb and enjoy!

Thursday 12 April 2012

Vegetarian ‘Pork’ Pie Recipe

Since starting up my ‘Something Missing’ blog I have wanted to set myself a bit of a baking challenge and stretch my imagination in terms of substituting one set of ingredients with another but still getting a final result that matches the original product. After thinking long and hard about things that I enjoy that others on restricted diets may not be able to I decided upon attempting to make a traditional pork pie but replacing the pork with a vegetarian alternative. I didn’t just want to make a vegetable pie but wanted something that was similar to the texture and taste of a pork pie (not that I was planning on coming up with something that tasted majorly of pork but that had the subtle flavourings associated with the British classic). With summer coming and a season of picnics and packed lunches on the beach ahead of us (yup I am on optimistic Brit and am ever hopeful that the sun will shine all summer long) nothing beats the crumbly texture of a Melton Mowbray Pie, filled with pork and lined with luscious jelly. So I dissected each of these elements, turned them veggie and produced a final result that I think any vegetarian would be happy to eat alongside a carnivore (in fact I think a lot of carnivores would be pretty happy to eat these too)…and if you didn’t bother with an egg wash on the pastry these little beauties would be vegan too!!


INGREDIENTS

PASTRY
290g plain flour
2g salt
120g vegetable fat (I used Cookeen – a vegetable alternative to lard)


80ml water

FILLING
350g silken tofu
1 medium carrot grated
75g breadcrumbs
25g oats
1 teaspoon mustard
½ teaspoon dried sage
½ teaspoon dried thyme
½ teaspoon mace
Pinch of salt and pepper
1 beaten egg to glaze the pie with

JELLY          
Vegetable stock
Vegetarian setting agent (I used Vegeset)


MAKES 8

Put the flour and salt into a bowl, add half of the fat and rub into the flour mixture.

Add the remaining fat and the water to a small saucepan and place over a medium heat until the fat is melted and the mixture begins to boil.

Add the hot fat and water mixture to the flour and mix together with a wooden spoon.

As soon as the mixture is cool enough to handle knead well on a floured surface for 5 minutes until the mixture has a smooth texture.

Divide the mixture into 10 equal balls, wrap in cling film and place in the fridge overnight.

The next day remove the pastry from the fridge and allow to warm slightly so that it is easier to handle. Then pre-heat the oven to 200 deg C / 390 deg F.

Whilst the pastry is warming put the tofu into a large bowl and mash until it is broken down. Then add the rest of the filling ingredients and mix well until well combined. Set to one side.

Now is the part where you mould the pastry to form free standing pie cases (as detailed in the photos below). To start take one of the balls of dough and form it into a small disk. Then gradually work the disk with your forefingers and thumbs pushing into the centre of the disk to make an indentation whilst raising up the sides of the pastry to form a small dish. Keep doing this until the sides have been worked up to about 4-5cm in height trying to ensure and even thickness of the pastry all the way around.


Repeat this process with another 7 of the balls of pastry dough (you want to leave 2 of the balls to make lids to the pies with). Then spoon the filling mixture into each pie casing, pushing it down and packing it in quite snugly. Depending on how large you end up making your pie cases you may have some filling left over so don’t panic if you do…it’s quite yummy just gently fried up and stuck in a sandwich!!

Now take the remaining 2 balls of pastry dough and split each into 4. Using either just your finger tips or if you prefer use a rolling pin to make 8 disks that will form the lid of each pie. Place the lid onto the pie and use your fingers to pinch together the edges of the pie case and lid (see photo above). Then trim any excess from around the edges to neaten up the pie (I did this with my kitchen scissors!!)

Place the pies onto a baking tray and make a hole in the centre of each lid with the tip of a sharp knife. Then use a pastry brush to coat each pie with the beaten egg. Place the baking tray into the oven and bake for 50 minutes to an 1 hour. After this time the pies should be nicely golden brown so remove from the oven and set aside to cool.

Now for the jelly (a ‘pork’ pie wouldn’t be a pork pie without it!) I used a vegetarian setting agent called Vegeset. There are other veggie friendly gelatine alternatives available on the market so best to follow the instructions for whichever you get. But I added 1 large teaspoon of Vegeset to a pint of cool vegetable stock (I cheated and used a vegetable stock cube, then added a couple of bay leaves to the stock and allowed it to infuse for a while to enhance the flavour a bit…but if you make your own stock from scratch this would probably taste even better). I then brought the stock up to the boil stirring all the time until it began to thicken.

Once you have followed your setting agents instructions transfer the jellified stock to a small pouring jug and then pour the contents into the top of each pie through the small hole in the pie lid. This process make take a bit of time and patience as you allow the stock to bubble through the hole. But once each pie has had its helping of jelly (and this may not use a whole pint of liquid, again depending on how large your pies turned out to be) leave the pies to cool.

Once cooled pack up your pies for your summer picnic…or alternatively dive right in.

Pastry recipe adapted from Channel 4 Pork Pies

Tuesday 3 April 2012

Tropical Vegan Hot Cross Buns

It has been a long standing tradition in my family that we all congregate together on Good Friday at a trout farm in the midst of the Kent countryside. For most such an event would probably not signal the beginning of their Easter celebrations but for us it has become a much anticipated annual event! Part of this reason is due to the hot cross bun baking competition that accompanies the trip.

You see for as long as I can remember my extended family have all headed to the said local trout farm on the morning of Good Friday to collect fresh fish for our lunch. We go equipped with flasks of freshly brewed coffee and a batch of homemade hot cross buns and whilst waiting for our trout to be fished out of the collecting ponds we gather around a picnic bench by one of the fishing lakes surrounded by daffodils and the odd greedy goose and tuck into our ‘Easter Elevenses’. I can’t recall the exact year but on one past Good Friday rather than feasting on just one batch of hot cross buns a couple of members of the family brought along their home made goodies and the rest of us made comments on which we preferred….and before we knew it we were all getting up early before our fish farm visit to bake up a batch of the best possible hot cross buns we could muster in the hope that the rest of the family would deem ours to be their favourite. My family if nothing else are a competitive bunch and our hot cross bun baking competition has become a toughly fought event ever since.

This year I thought I had better make a hot cross bun that would fit in with the theme of my blog so went for a vegan option that replaces the normal milk and eggs used with coconut milk. And seeing as the coconut brings a bit of a Caribbean vibe to these traditional buns I decided to go the full hog and added dried papaya and pineapple for a truly tropical twist….fingers crossed the rest of my family like these on Friday!


INGREDIENTS

350g plain flour
1 teaspoon ground cinnamon
1 teaspoon ground ginger
½ teaspoon mixed spice
7g sachet dried instant yeast
45g caster sugar
50g dried pineapple core
50g dried papaya chunks
50g sultanas
Zest from 1 lime
70g margarine
175ml coconut milk

FOR THE CROSSES

50g plain flour
45 ml coconut milk

FOR THE GLAZE

2 tablespoons golden syrup

Pre-heat the oven to 180 deg C

Put all of dry ingredients into a large bowl.

Put the coconut milk and margarine into a small saucepan and gently heat until the margarine begins to melt. Then remove from the heat and allow to cool slightly so that you have a lukewarm mixture.

Make a well in the centre of the dry ingredients and pour in the coconut milk mix.

Bring the wet and dry ingredients together with your hands until a large ball of dough is formed. Tip the dough mixture out onto a floured surface and knead for 10 minutes, return to the bowl, cover with a tea towel and allow to rise for about 1 hour until doubled in size.

Once the dough has risen divide into 10 equal portions and shape each into a round ball. Evenly space the balls on a large baking tray and score the tops with a knife to make a cross. Then allow to rise again, this time for about 30 minutes.

In the meantime mix the 50g of flour and 45ml of coconut milk together in a small bowl until you have a smooth paste. Transfer the paste to a piping bag (you can make one of these out of a square of greaseproof paper, or alternatively just use a plastic sandwich bag with the corner snipped off).

Once risen pipe a cross onto the buns, along the crosses previously scored into them. Then bake in the oven for 20 minutes or until golden brown.

Place the golden syrup in a small bowl and heat in the microwave for a couple of seconds until nicely runny. As soon as the hot cross buns are removed from the oven use a pastry brush to glaze the hot cross buns with the syrup.

Allow to cool just slightly then tuck in….add a knob of butter/vegan margarine to a warm slice of hot cross bun for an extra indulgent addition to these seasonal treats.